
Inštrukcie na obsluhu Broncolor Siros 800 S WiFi / RFS 2
Nasledujúce prevádzkové inštrukcie pre Broncolor Siros 800 S sú reprodukciou oficiálnych materiálov od výrobcu pre rýchle použitie pre PhotoRobot zákazníkov. Tieto materiály majú za cieľ podporiť počiatočné pochopenie a nezávislú prevádzku ich zariadenia Broncolor Siros 800 S. Majte však na pamäti, že svetlá Broncolor sú spravované priamo v PhotoRobot _Controls aplikácii. To zabezpečuje, že na strane zákazníka nie je potrebné inštalovať ovládače na správu hardvéru Broncolor.
Pre technické informácie o hardvérových komponentoch, softvérových nástrojoch, hlavných režimoch a odporúčaných nastaveniach pre svetlá Broncolor s PhotoRobot pozri PhotoRobot – Správa svetiel Broncolor.
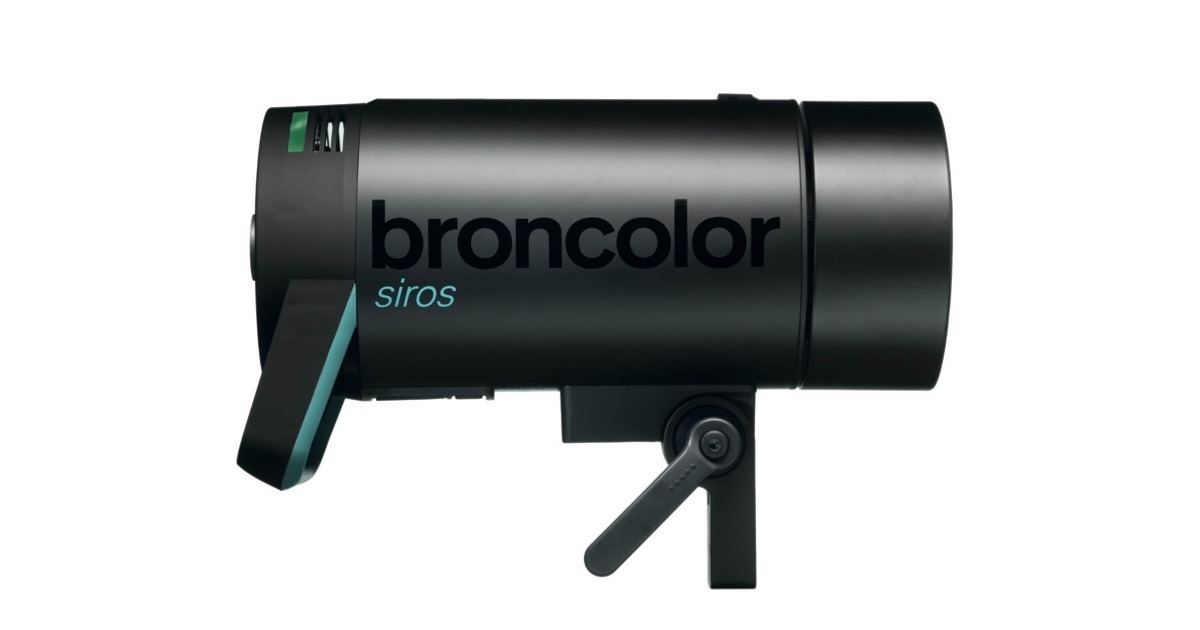
Poznámka: Tieto prevádzkové inštrukcie sú reprodukciou oficiálnych prevádzkových inštrukcií výrobcu pre štúdiové svetlá Broncolor Siros 8 S series. Pre pôvodnú dokumentáciu k vášmu konkrétnemu produktu sa pozrite na webovú stránku výrobcu broncolor.swiss . Zároveň si pred prvým použitím dôkladne prečítajte všetky inštrukcie špeciálne priložené k vášmu zariadeniu.
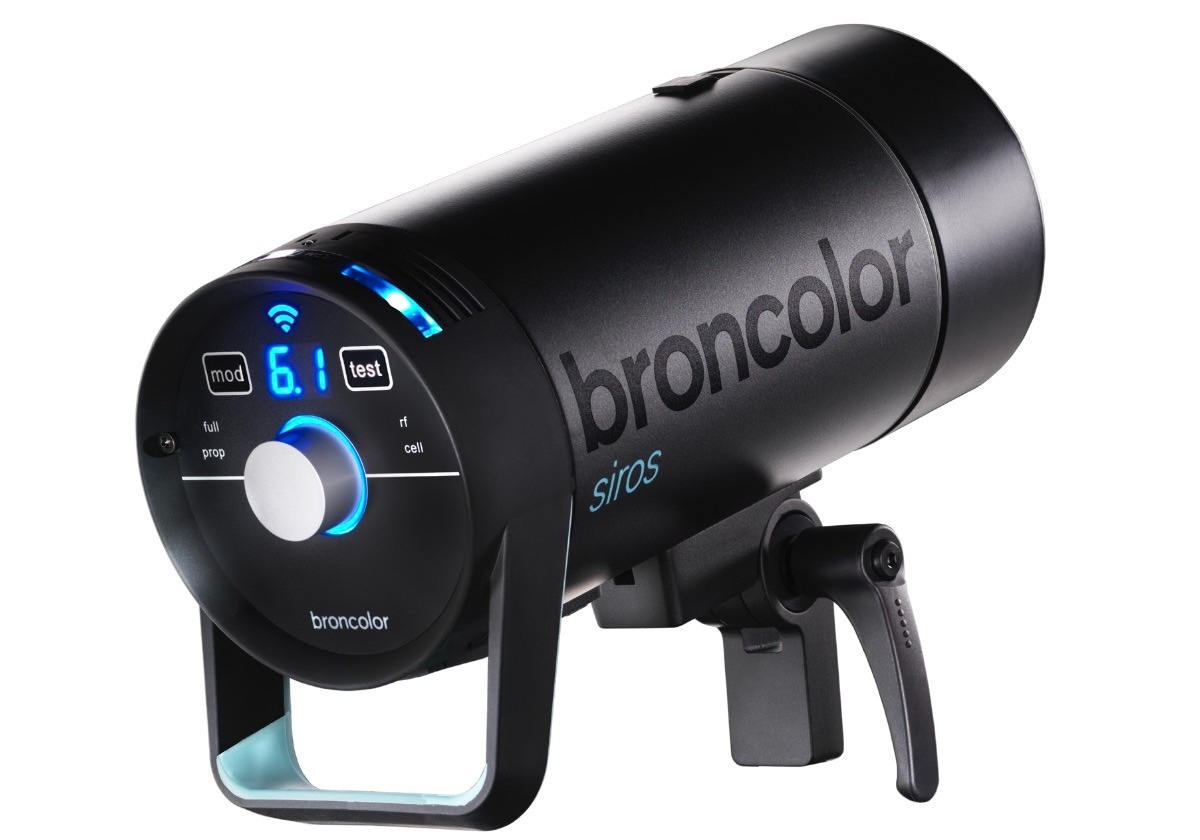
Ovládanie a displeje
Ovládanie a displeje pre Broncolor Siros 800 S sú nasledovné.
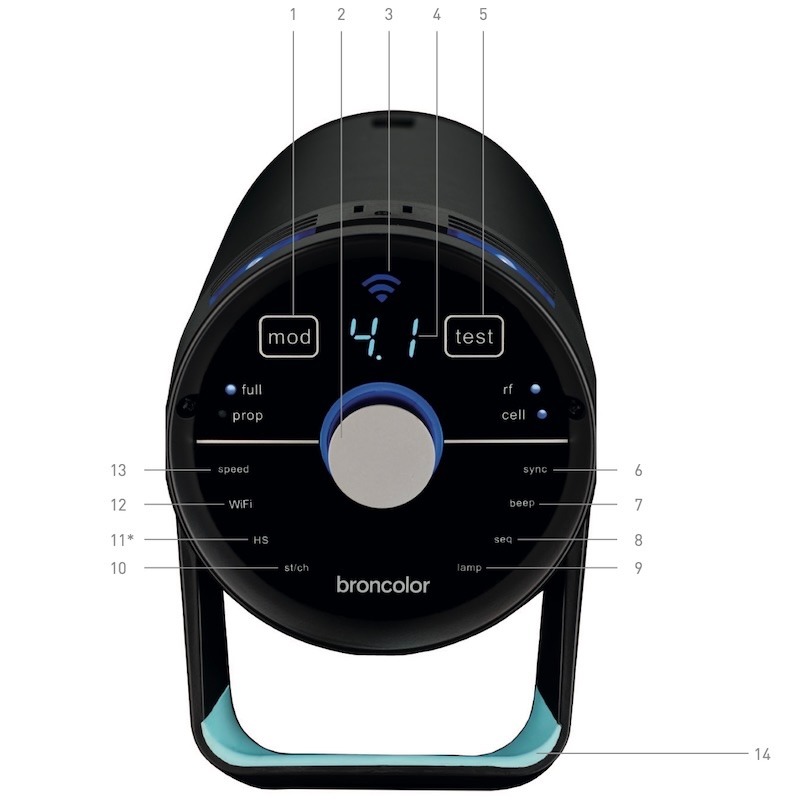
- Modelovacie svetlo zapnuté/vypnuté
- Rotačný ovládač
- WiFi displej
- Digitálny displej distribúcie energie
- Kľúč "test"
- Nastavenia menu
- Nastavenia menu
- Nastavenia menu
- Nastavenia menu
- Nastavenia menu
- Nastavenia menu
- Nastavenia menu
- Nastavenia menu
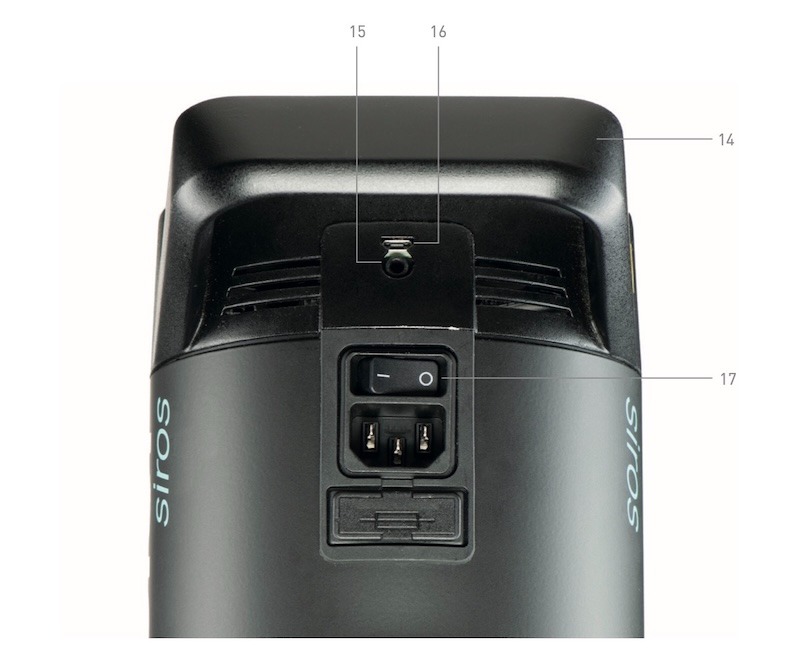
- Rukoväť
- Synchronizačná zásuvka
- Mini USB
- Sieťový prepínač
Pred použitím
Broncolor Siros S je kvalitný produkt, ktorý poskytuje roky služby, ak sa používa správne. Nezabudnite si dôkladne prečítať všetky informácie v týchto prevádzkových pokynoch, ktoré obsahujú aj dôležité pokyny na používanie a údržbu spotrebiča. Odkážte ďalších používateľov na tieto pokyny, aby ste nových používateľov oboznámili so zariadením, jeho používaním a údržbou. Okrem toho vždy dodržiavajte bezpečnostné pokyny, ktoré sú pre vaše zariadenie poskytnuté samostatne od Broncolor.
Obsah
- Rozsah zásobovania
- Prvý štart
- Riadiace prvky
- Prehľad funkcií hlavného menu
- Navigácia menu
- Ovládanie časov záblesku
- Vydanie
- Funkcia HS
- Špeciálne funkcie
- Informácie a správy o poruchách
- Často kladené otázky
- Príslušenstvo
- Údržba / Opravy
- Informácie o ochrane životného prostredia
- Záruka a upozornenie pre britských zákazníkov
- Technické údaje
1. Rozsah ponuky
1.1. Siros 800 S WiFi / RFS 2 – 31.643.XX
Najprv sa uistite, že ste dostali nasledujúce položky v rámci doručenia.
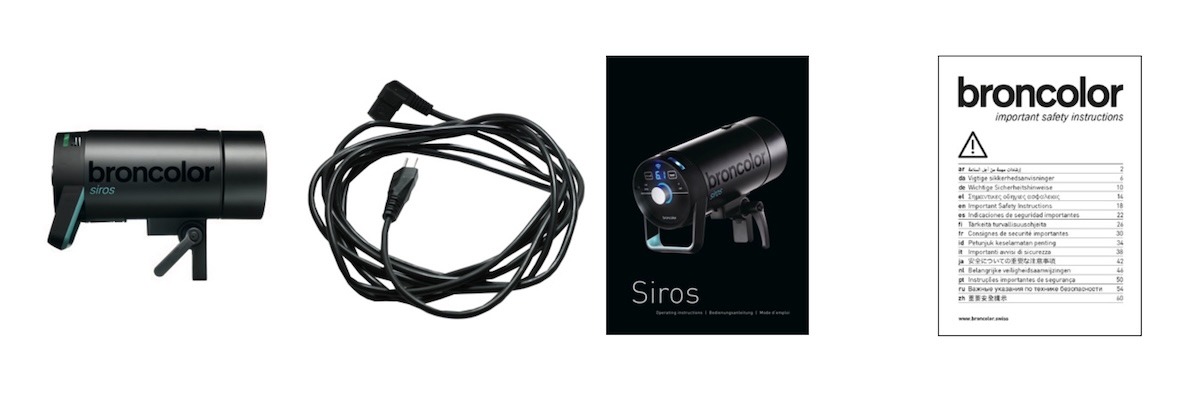
- Siros S Monolight
- Sieťový kábel
- Prevádzkové inštrukcie (BA109.00)
- Dôležité bezpečnostné pokyny (WA-18-1)
1.2. Stavebnice
Obsah Siros Expert Kit zahŕňa:
- 2× Siros 800 S WiFi / RFS 2
- 1× Dáždnik, 85 cm (33.574.00)
- 1× Softbox 60 x 60 (33.561.00)
- 1× Rýchlostný kruh (33.401.00)
- 2× Juniorská tribúna AC (35.100.00)
- 1× Flash Bag 2 (36.532.00)
- 1× Taška na príslušenstvo (36.535.00)
- 1× Synchronizačný kábel (34.111.00)
Obsah Siros Pro Kit zahŕňa:
- 3× Siros 800 S WiFi / RFS 2
- 1× Softbox 60 x 60 (33.561.00)
- 1× Octabox 75 (33.600.00)
- 2× Rýchlostný kruh (33.401.00)
- 2× L40 štandardný reflektor (33.115.00)
- 3× Juniorská tribúna AC (35.100.00)
- 1× Flash Bag 3 (36.533.00)
- 1× Taška na príslušenstvo (36.535.00)
- 1× Synchronizačný kábel (34.111.00)
2. Prvý štart
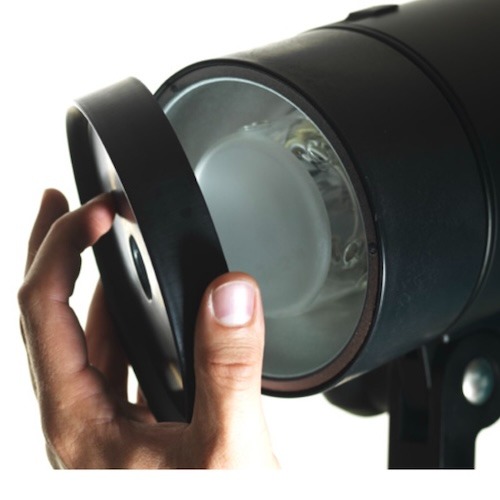
2.1. Odstrániť ochranný kryt
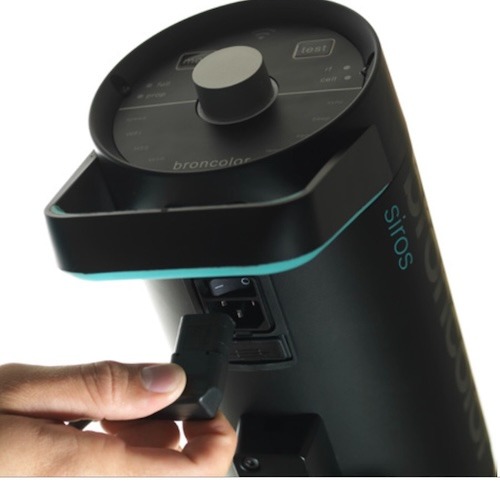
2.2. Zapojiť sieťový kábel
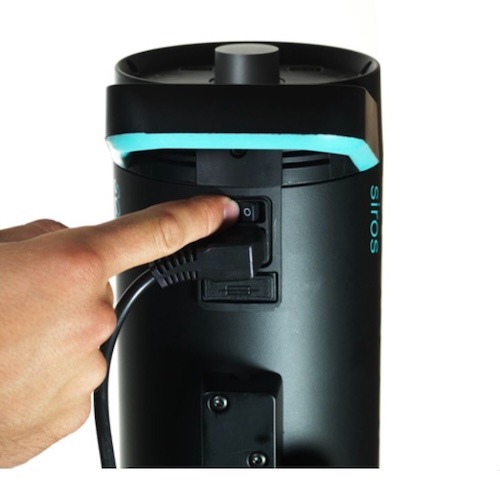
2.3. Zapnite jednotku na hlavnom prepínači
3. Riadiace prvky
3.1. Funkcie prvkov
Rotačný ovládač (2)

- Rotačný ovládač (2) slúži na zapnutie a vypnutie jednotky (pohotovostný režim). Stlačením rotačného ovládača na 3 sekundy sa jednotka prepne do pohotovostného režimu.
- V menu otáčajúci ovládač umožňuje navigáciu v menu a potvrdenie položiek menu. Ďalšie vysvetlenie navigácie v menu je uvedené v kapitole 5.
- Počas prevádzky rotačný ovládač mení energiu blesku. Otáčanie proti smeru hodinových ručičiek znižuje energiu blesku, zatiaľ čo otáčanie v smere hodinových ručičiek ju zvyšuje. Medzitým otáčanie ovládača pomaly mení energiu o 1/10 clony a otáčanie rýchlo ("krútenie") o 1/1 clony.
Informačný displej (4)
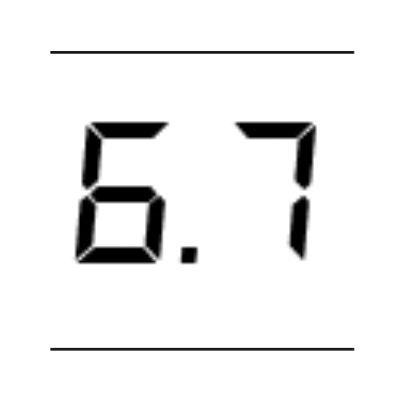
- Informačný displej (4) zobrazuje vybranú energiu záblesku alebo možnosti výberu v menu.
Mod - Modelovacie svetlo ZAPNUTÉ / VYPNUTÉ (1)
- Použite "mod" (1) na zapnutie alebo vypnutie modelovacieho svetla. Dlhšie stlačenie tlačidla zmení prevádzkový režim z "full" na "prop" alebo naopak.
Test (5)
- Použitím "testu" (5) sa spustí test. Zobrazenie "Pripravené" okolo rotačného ovládača sa zmení na modré hneď po dokončení nabíjania/vybíjania.
3.2. Funkcie menu
Rýchlosť (13)
- Nastavenie menu "rýchlosť" (13) je určené na rýchle nabíjanie a časy blikania. Ďalšie vysvetlenie nájdete v kapitole 6 týchto prevádzkových inštrukcií.
WiFi (12)
- "WiFi" (12) označuje, či je WiFi zapnuté alebo vypnuté.
HS (11)

- "HS" označuje, či je HS zapnutý alebo vypnutý.
Štúdio / Kanál (10)
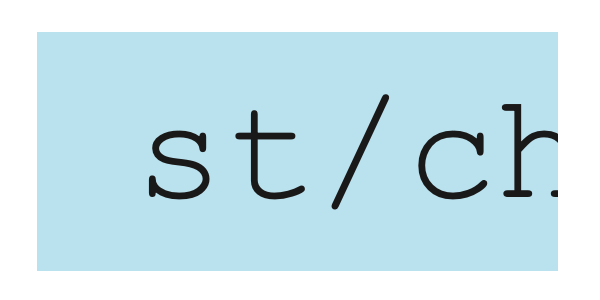
- Nastavenie menu "st / ch" (10) slúži na zmenu štúdia / kanála. Použite ho na prepínanie aktuálneho štúdiového kanála (RFS 2).
Lampa (9)

- Použite lampu menu (9) na výber kanála lampy (RFS 2).
Sekvencia (8)
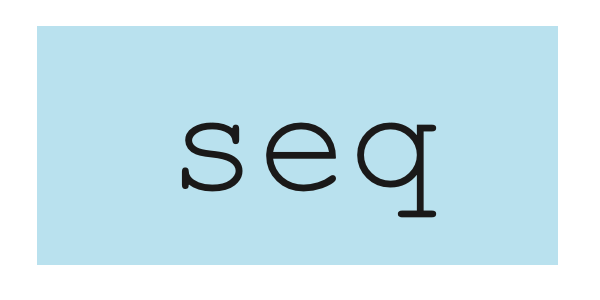
- Menu "seq" (8) vyberá počet zábleskov.
Píp (7)

- Funkcia menu "pípnutie" (7) ukazuje, či je akustické varovanie "Ready" zapnuté alebo vypnuté.
Sync (6)
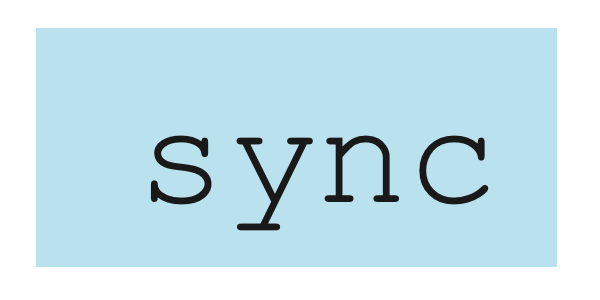
- Použitie "sync" (6) umožňuje výber rôznych spôsobov uvoľnenia (fotocela, rádio, fotobunka a/alebo rádio).
Sync socket / Mini USB (15 / 16)

- Použite funkcie menu Sync socket / Mini USB (15 / 16) na uvoľnenie cez sync kábel alebo softvérovú aktualizáciu cez mini USB.
Zapnuté / vypnuté (17)

- Na zapnutie alebo vypnutie použite zapnutie / vypnutie (17) na jednotke.
4. Prehľad hlavných funkcií
Hlavné funkcie sú nasledovné.
- Pre vstup do hlavného menu stlačte rotačný ovládač (2).
- Otočte rotačný ovládač (2) v smere hodinových ručičiek alebo proti nemu, aby ste sa dostali k požadovanej položke menu.
- Na potvrdenie výberu stlačte opäť rotačný ovládač (2). Vybraná položka menu začne blikať.
5. Navigácia v menu
Funkcie menu Broncolor Siros 800 S zahŕňajú:
- Rýchlosť
- WiFi
- HS
- st/ch
- Lampa
- seq
- píp
- synchronizácia
Po stlačení rotačného ovládača (2) vstúpite do hlavného menu monolightu. Odtiaľ máte prístup k rôznym funkciám.
Upozorňujeme: Ak nie je možné vybrať položku v menu, napríklad pri produktoch iných ako Siros 800 S, zariadenie túto funkciu nepodporuje.
Príklad: Nastavte sekvenciu 15 zábleskov na jedno uvoľnenie.
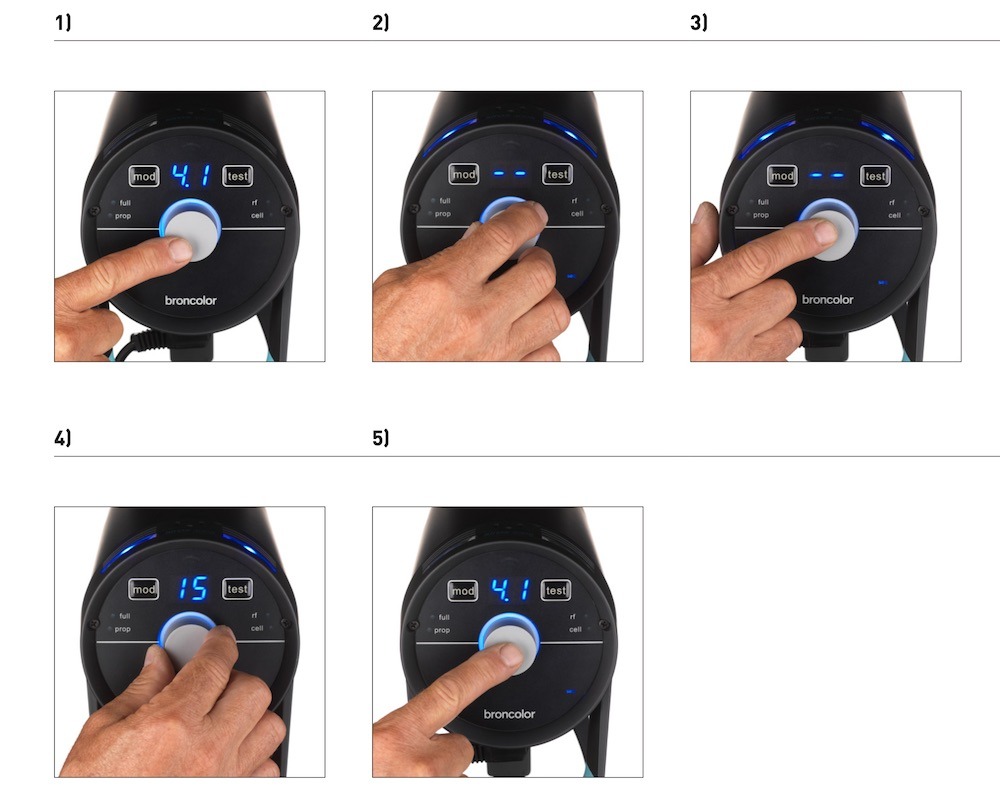
- Stlačte otočný ovládač (2) pre vstup do hlavného menu. Zobrazí sa posledná vybraná položka menu. Hlavný displej sa zmení z výstupného výkonu na vybranú položku menu.
- Otočte rotačný ovládač (2), kým nedosiahnete položku menu "seq".
- Stlačte rotačný ovládač (2) na potvrdenie tejto funkcie. Displej "seq" začne blikať.
- Otáčajte rotačný ovládač (2), kým sa na hlavnom displeji neobjaví "15".
- Potvrďte tento výber stlačením rotačného ovládača (2). Po tomto potvrdení sa jednotka prepne do normálneho stavu. Ak výber nie je potvrdený do 5 sekúnd, jednotka sa prepne do normálneho stavu bez zmeny nastavenia.
6. Riadenie časov záblesku
V hlavnom menu môžete nastaviť čas záblesku monolightu na "rýchlosť". Toto nastavenie vypočíta najrýchlejší možný čas záblesku pre zvolenú energetickú úroveň. To môže tiež spôsobiť, že farba blesku sa mierne posunie smerom k modrej oblasti.
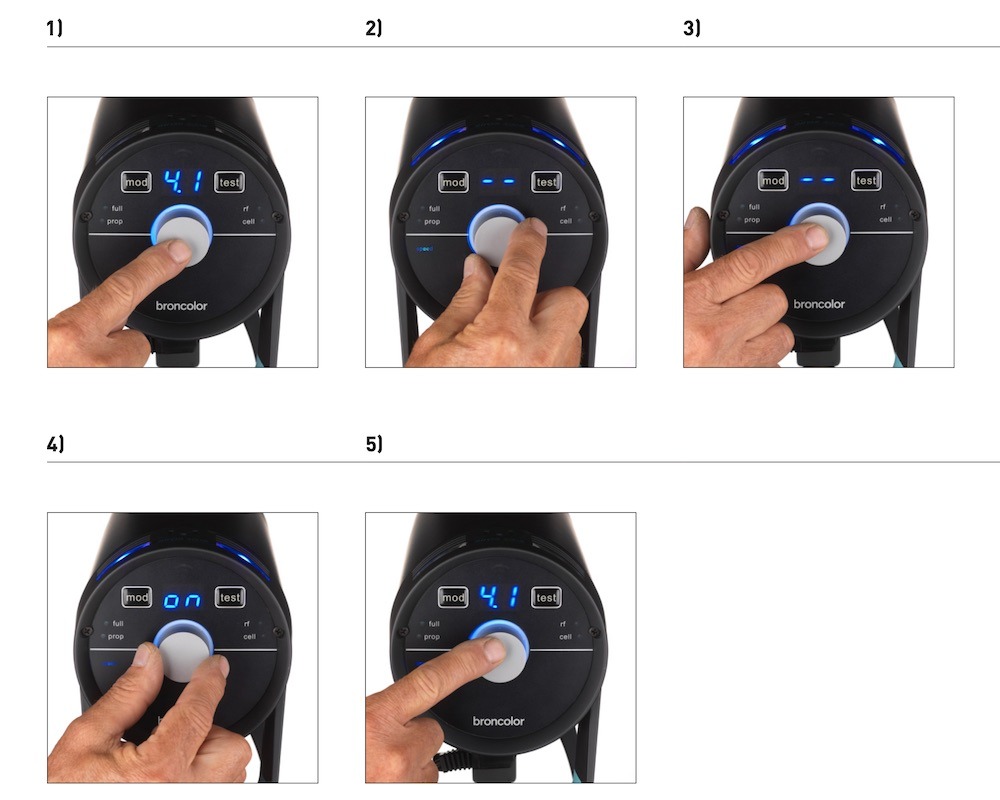
- Stlačte rotačný ovládač (2) pre vstup do hlavného menu.
- Otáčajte rotačný ovládač (2), kým nedosiahnete položku menu "rýchlosť".
- Potvrďte tento výber stlačením rotačného ovládača (2).
- Použite rotačný ovládač (2) na výber možnosti "zapnuté" alebo "vypnuté".
- Potvrďte to s rotačným ovládačom (2).
7. Uvoľnenie
7.1. RFS 2 modul (rádiofrekvenčný systém)
Pre ovládanie blesku RFS 2 musí kanál (adresa štúdia) zodpovedať kanálu vysielača. Adresa štúdia je nastavená v menu na pozícii "st". Kanál lampy je definovaný v menu pod "lampa". Viac informácií o zmene farieb kognitických svetiel nájdete v sekcii 9.3.
S rádiovým transceiverom si môžete definovať a nastaviť jednotlivé lampy podľa vlastného uváženia. Ak sa chcete dozvedieť, ako to urobiť, pozrite si prosím návod na obsluhu transceivera. Transceiver nie je štandardne súčasťou jednotlivých hláv.
7.2. Fotobunka (bunka)
Fotobunku je možné zapínať a vypínať pomocou menu funkcie "sync" (6). Keď je táto funkcia aktívna, rozsvieti sa modrá LED vedľa štítku "cell". Po prvom záblesku sekvencie sa aktívna fotobunka deaktivuje a modrá LED vedľa klávesu "sync" (6) bliká. Stlačením tlačidla "test" sa opäť zapne.
7.3. Sync Socket (15)
Synchronizačné káble – 5 m (16,4 stopy) (čl. č. 34.111.00) a 10 m (32,8 stopy) (34.112.00) – môžu byť pripevnené do zásuvky pre uvoľnenie kábla (15).
7.4. "Testovať" kľúč (5)
Pomocou tohto tlačidla je možné monolight spustiť manuálne. Blesk sa spustí hneď, ako dosiahnete 70 % nastavenej energetickej hladiny. Vizuálny indikátor "Pripravené" sa naopak rozsvieti až po dosiahnutí 100 %.
8. Funkcia HS
V kombinácii s RFS 2.2 vysielačom môžete použiť Siros 800 S monolight s extrémne rýchlymi časmi uzávierky. Napríklad pri okolitom svetle, aj pri plne otvorenej clone (selektívne zaostrovanie), môže byť obraz správne podexponovaný až do 1/8000 s a Siros vám stále umožňuje nastaviť dominantné a kreatívne svetelné efekty.
Na to potrebujete len vysielač RFS 2.2, ktorý je dostupný pre fotoaparáty Canon, Fuji, Nikon a Sony. Okrem toho musí byť HS aktivovaný na všetkých jednotkách Siros. To upravuje krivku blesku a v kombinácii s RFS 2.2 zaručuje správnu expozíciu bez obmedzení voľby času uzávierky.
Prečítajte si prosím prevádzkové pokyny pre vysielač RFS 2.2, aby ste sa dozvedeli viac o optimálnom využití funkcie HS.
Pri práci v HS režime môžete používať len úroveň výkonu blesku 4 až 10 so Sirosom.
9. Špeciálne funkcie
9.1. Reset (na továrenské nastavenia)
Stlačte kláves "test" (5) na 4 sekundy. Tým sa všetky funkcie resetujú na továrenské nastavenia. Resetovanie je potvrdené dvojitým pípnutím.
9.2. Aplikácia "bronControl" a nastavenia WiFi
Na ovládanie svojho Siros monolight si môžete tiež bezplatne stiahnuť aplikáciu "bronControl". Na nájdenie aplikácie vyhľadajte "bronControl" v Apple App Store alebo v Google Play Store.
9.2.1. Prevádzkové režimy
9.2.1.1. Prevádzka v "súkromnom" režime (továrenské nastavenie)
Ak je režim WiFi aktivovaný na viacerých monolightoch, všetky tieto jednotky sa automaticky pripoja s rovnakou adresou štúdia a vytvoria privátnu sieť. Smartfón alebo tablet je potom potrebné pripojiť k tejto sieti, aby ju mohol ovládať. Na použitie aktivujte funkciu WiFi na svojom smartfóne alebo tablete. Vaše zariadenie potom automaticky vyhľadá dostupné WiFi siete. Pripojte svoj smartfón alebo tablet k príslušnej sieti Bron-Studio. Heslo pripojenia je: bronControl. Teraz spustite aplikáciu "bronControl" na svojom zariadení. Pridajte príslušné číslo štúdia pod "pridať nové štúdio" a pripojte aplikáciu k tomuto štúdiu. Pre ďalšie pokyny k prevádzke použite funkciu pomoci "?" v aplikácii.
9.2.1.2. Prevádzka v režime "Enterprise"
Ak existuje existujúca WiFi sieť (router), zariadenie je možné integrovať do tejto siete pomocou smartfónu alebo tabletu. Na dosiahnutie tohto cieľa prejdite v aplikácii "bronControl" v nastaveniach do "Nastavenia siete" a zadajte nastavenia routera v režime "enterprise". Uistite sa, že jednotky sú nastavené na správnu adresu štúdia. Siros uloží posledný typ pripojenia a pri ďalšom spustení sa pokúsi pripojiť k poslednej sieti.
9.2.2. Nastavenia menu
Nastavenia menu sú definované nasledovne: zapnuté / vypnuté / synchronizované (zapnuté / -- / sy).
9.2.3. WiFi displej (3) na jednotke
Symboly a ich popisy pre Wifi displej (3) na zariadení sú nasledovné.
9.3. Kognótne svetlá
Keď sú vybrané rôzne kanály lampy (zóny), kognitívna kontrolka na hornej ploche jednotky zmení farbu. Účelom je rozlíšiť jednotlivé jednotky, keď sú ovládané aplikáciou "bronControl". Svetlo na jednotke zmení farbu, keď je aplikácia aktivovaná na smartfóne alebo tablete alebo keď sa stlačí rotačný ovládač na jednotke; pri opustení menu sa opäť zmení na modrú.
Farby kanálov lampy sú nasledovné.
10. Informácie a správy o poruchách*
10.1. Akustické signály
Akustické signály sú pípnutie alebo dvojité pípnutie.
10.2. Správa na displeji
Poznámka: *Chybové hlásenia sú vždy tiež označené červeným kognícnym svetlom.
11. Často kladené otázky
11.1. Výmena bleskovných trubíc
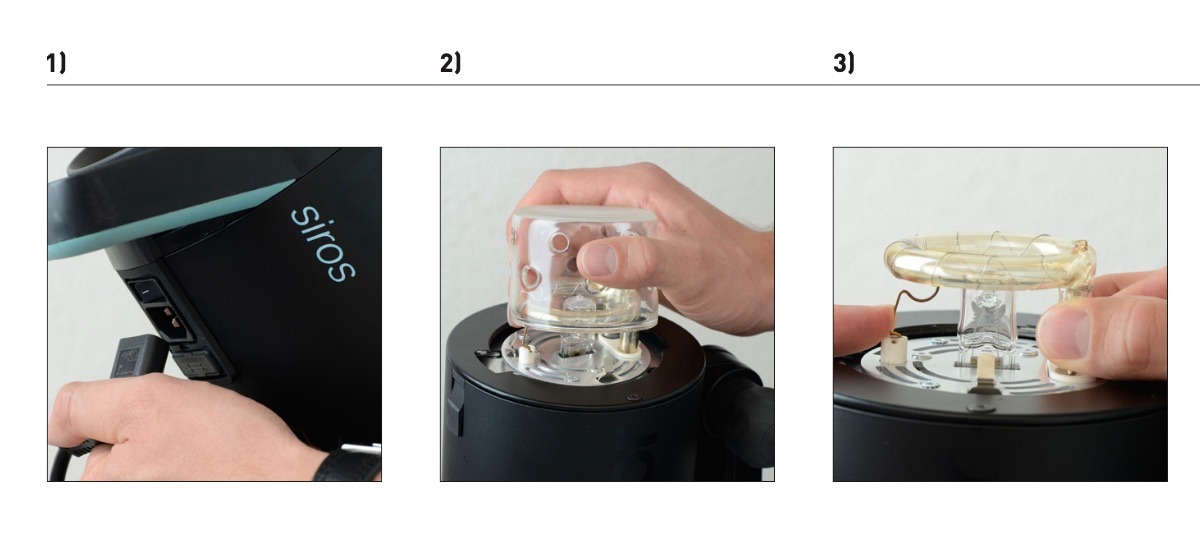
- Odpojte sieťový kábel od jednotky.
- Bezpečnostné sklo odstráňte vytiahnutím z upevňovacích klipov.
- Stlačte kontaktnú pružinu smerom nadol a opatrne vytiahnite bleskovú trubicu.
11.2. Výmena poistky
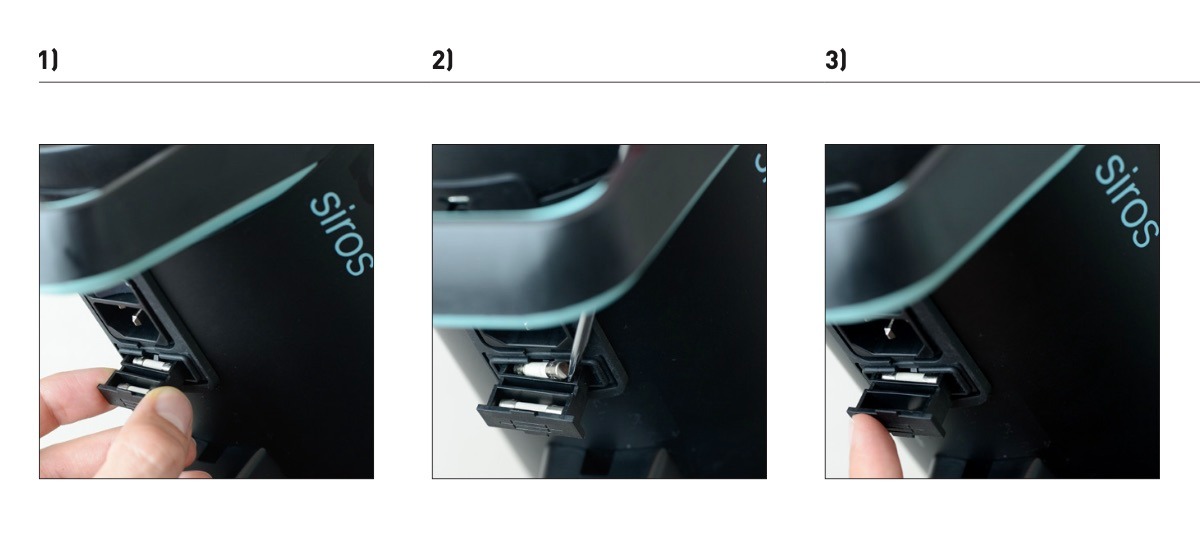
- Odpojte sieťový kábel od jednotky (pozri obrázok 1 vyššie). Otvorte poistkový priestor pod jednotkou.
- Opatrne vyberte prepálenú zápalnú šnúru špicatým predmetom.
- Vlož náhradnú poistku a opäť zatvor poistkový priestor
11.3. Meniaci sa tvarovači svetla
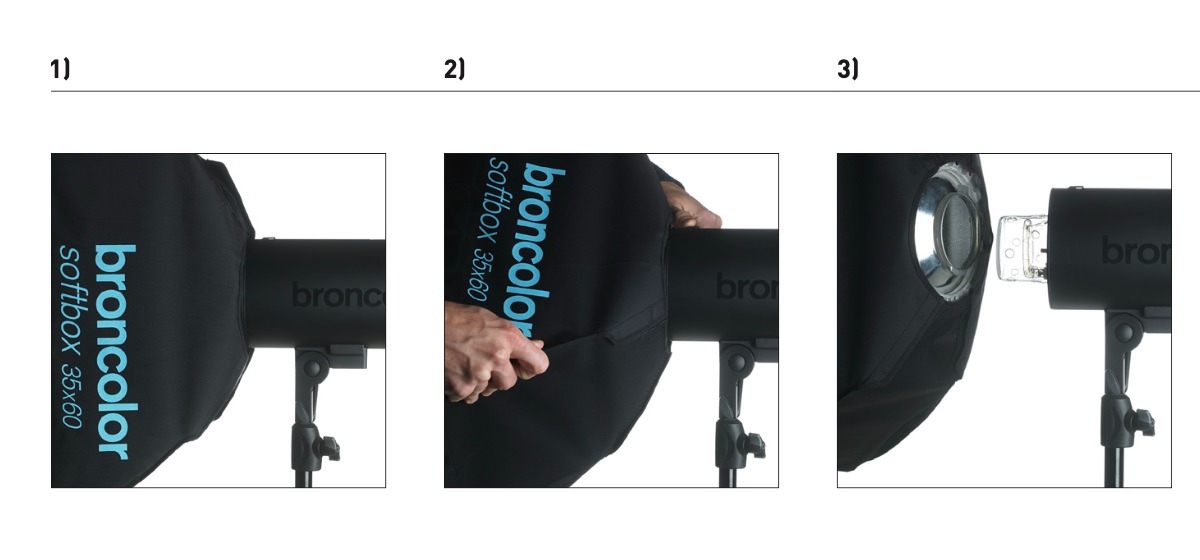
- Otočte tvarovač svetla v ktoromkoľvek smere až na zastavenie.
- Potiahnite uvoľňovač dozadu a zároveň otáčajte tvarovačom svetla, kým nie je voľný z bajonetu.
- Opatrne odstráňte tvarovač svetla dopredu. Dávajte pozor, aby ste nepoškodili bezpečnostné sklo.
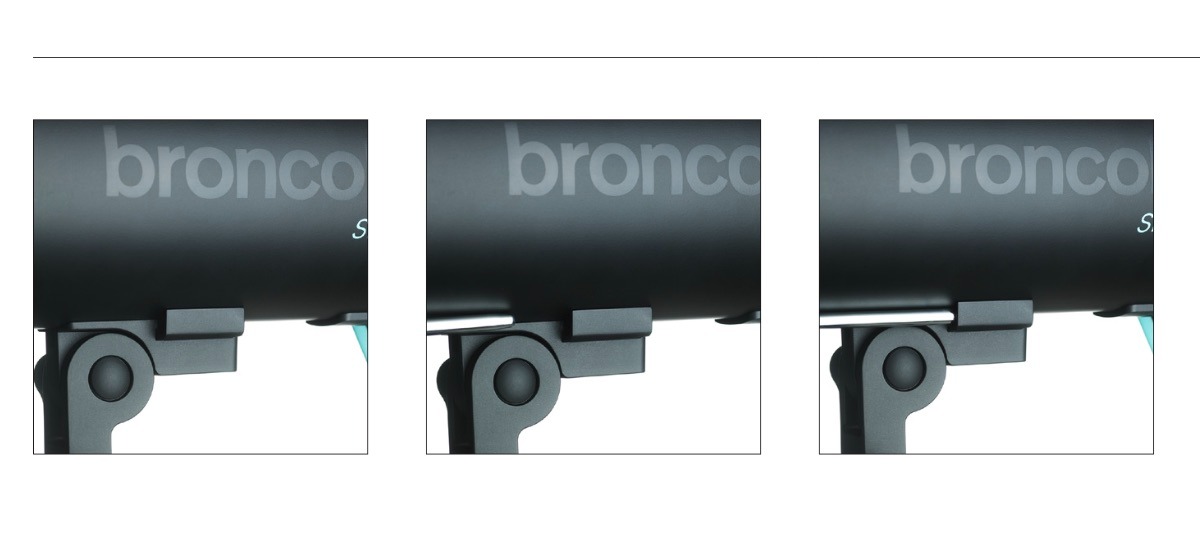
11.4. Upevnenie dáždnika
Na upevnenie dáždnika ho umiestnite do otvoru pod jednotkou.
12. Doplnky
Siros je kompatibilný s celou radou tvarovačov svetla Broncolor.
Nasledujúce položky predstavujú špeciálne odporúčané doplnky:
13. Údržba a opravy
Váš Broncolor Monolight je presný prístroj, schopný zabezpečiť roky bezproblémovej prevádzky, ak sa s ním zaobchádza s náležitou starostlivosťou. Ak však dôjde k poruche, prosím, nepokúšajte sa zariadenie otvoriť a opraviť sami. Aj keď je jednotka vypnutá, vo vnútri môže byť stále nebezpečné napätie. Preto na údržbu a opravy vždy posielajte jednotku na servisné miesto Broncolor.
14. Informácie o ochrane životného prostredia
Na konci svojej životnosti sa tento produkt nesmie likvidovať ako bežný domáci odpad. Namiesto toho musí byť odvezený na zberné miesto na recykláciu elektrických a elektronických spotrebičov. Materiály sú recyklovateľné podľa ich označení. Opätovným použitím, recykláciou alebo inými formami využívania starých spotrebičov významne prispievate k ochrane nášho životného prostredia.
Prosím, požiadajte svoje miestne úrady alebo predajného partnera Broncolor o vhodnom mieste likvidácie.
15. Záruka
Všetky napájacie zdroje, lampy, monolighty a príslušenstvo Broncolor sú vyrobené podľa vysokej kvality. Broncolor ponúka dvojročnú továrenskú záruku od dátumu nákupu (pre prvého majiteľa) na vyššie uvedené produkty Broncolor. Z tejto záruky sú vylúčené bleskové trubice, halogénové lampy, bezpečnostné okuliare, káble, batérie a textil. Chyby spôsobené nedodržaním bezpečnostných pokynov, nesprávnym zaobchádzaním, použitím príslušenstva od iného výrobcu, neoprávneným zásahom alebo úpravami sú vylúčené z továrenskej záruky. Broncolor / PhotoRobot nepreberá zodpovednosť za škody spôsobené nedodržaním bezpečnostných pokynov, nesprávnym zaobchádzaním, použitím príslušenstva od iného výrobcu alebo neoprávneným zásahom či úpravou. V prípade technických problémov okamžite kontaktujte najbližšiu autorizovanú servisnú stanicu Broncolor. Čísla článkov, popisy produktov a rozsah dodávok sa môžu líšiť od krajiny k krajine. Pre podrobnejšie informácie kontaktujte svojho predajného partnera Broncolor. Chyby a tlačové chyby sú výnimkou.
16. Oznámenie pre britských zákazníkov
Toto zariadenie je možné nakonfigurovať na pripojenie k bezdrôtovej LAN sieti. Prosím, nakonfigurujte tento produkt tak, aby sa pripojil k zabezpečenej infraštruktúre. Nepoužívajte konfiguračný režim na bežnú prevádzku.
- Správy o bezpečnostných zraniteľnostiach: support@broncolor.swiss
- Reakčný čas: 30 dní
- Definovaná doba podpory vo Veľkej Británii: 2 roky po dátume predaja, platí len pre produkty predávané vo Veľkej Británii (okrem Severného Írska) od 29. apríla 2024 alebo po
- Názov výrobcu: Bron Elektronik AG
- Adresa výrobcu: Hagmattstrasse 7, 4123 Allschwil, Švajčiarsko
17. Technické údaje


Séria EOS Rebel


Séria digitálnych zrkadloviek EOS


Séria bezzrkadlových fotoaparátov EOS M


Séria PowerShot


Detailný záber / Ručný záber

Séria Canon EOS Rebel ponúka digitálne zrkadlovky vhodné pre začiatočníkov so solídnou kvalitou obrazu, intuitívnym ovládaním a všestrannými funkciami. Tieto fotoaparáty sú ideálne pre fotografických nadšencov a poskytujú spoľahlivé automatické zaostrovanie, výklopné dotykové obrazovky a nahrávanie videa vo Full HD alebo 4K.
Pripojenie
Rozlíšenie (MP)
Rezolúcia
Séria digitálnych zrkadloviek Canon EOS poskytuje vysokokvalitné snímky, rýchle automatické zaostrovanie a všestrannosť, vďaka čomu je ideálna na fotografovanie aj produkciu videa.
Pripojenie
Rozlíšenie (MP)
Rezolúcia
Séria Canon EOS M Mirrorless kombinuje kompaktný dizajn s výkonom podobným digitálnej zrkadlovke. Vďaka vymeniteľným objektívom, rýchlemu automatickému zaostrovaniu a vysokokvalitným obrazovým snímačom sú tieto fotoaparáty skvelé pre cestovateľov a tvorcov obsahu, ktorí hľadajú prenosnosť bez obetovania kvality obrazu.
Pripojenie
Rozlíšenie (MP)
Rezolúcia
Séria Canon PowerShot ponúka kompaktné a užívateľsky prívetivé fotoaparáty pre príležitostných strelcov a nadšencov. S modelmi od jednoduchých point-and-shoot až po pokročilé fotoaparáty so zoomom poskytujú pohodlie, solídnu kvalitu obrazu a funkcie, ako je stabilizácia obrazu a 4K video.
Pripojenie
Rozlíšenie (MP)
Rezolúcia
Fotoaparáty Canon na detailné zábery a ručné fotoaparáty sú určené na detailné fotografovanie a natáčanie videí zblízka. Sú kompaktné a ľahko použiteľné, ponúkajú presné zaostrovanie, zobrazovanie vo vysokom rozlíšení a všestranné možnosti makro – ideálne na vlogovanie, produktovú fotografiu a kreatívne zábery zblízka.


